Ongoing and unfinished
Todo:
- Install Raspbian
- Enable SSH
- Change password
- Pinout
- Wiring
- Driver
- Tell ingredients and cost
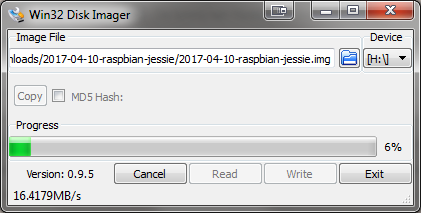
First we need to put Raspbian on a microSD card. I’m using 2017-04-10-raspbian-jessie on a Kingston 32GB MicroSD class 10 UHS-1, which I had lying around. Using Win32DiskImager we can write the linux image to the SD card.
As I don’t want to connect a monitor, keyboard nor network card, we need to setup a headless OTG configuration which allows us to SSH to the Pi over the USB interface (and the USB interface only). This little GitHub Gist shows what we need to do:
- add
dtoverlay=dwc2toconfig.txt - add
modules-load=dwc2,g_etherafterrootwaitincmdline.txt - add an empty file call
sshto the root of the SD card
This enables a virtual network adapter over the USB port and allows SSH. We can now boot the Pi with the SD card and connect with only the USB cable attached. The first boot will take a while.
We also need to uncomment dtparam=spi=on in config.txt to enable the SPI driver.
Boot and SSH to pi@raspberrypi.local (e.g. in Windows using Putty). The default password is raspberry. You should change this immediately using passwd.
Now that it boots and we can access it, we can connect the screen.
Thie Raspberry Pi Zero pinout is as follows (courtesy of pinout.xyz):
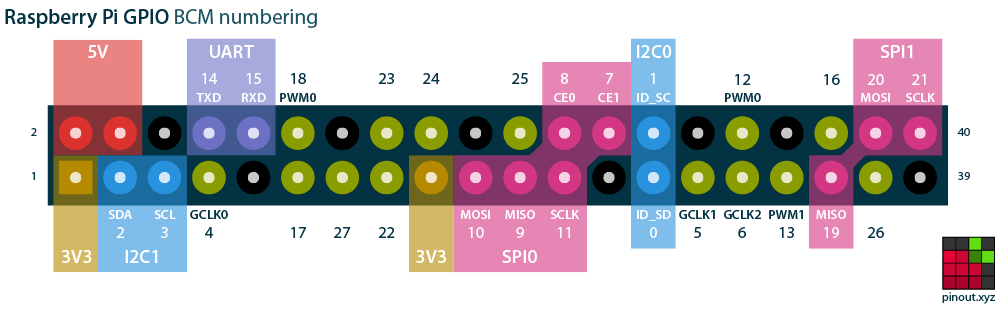
The wiring is as follows
| Display | Pi GPIO |
|---|---|
| LED | 23 |
| SCK | 21 (SCLK) |
| SDA | 20 (MOSI) |
| AO | 24 (DC) |
| RESET | 25 (RST) |
| CS | 8 (CE0) |
| GND | GND |
| VCC | 3.3V |