Here is a little guide on how to connect a tiny screen with an SPI ili9163 controller to your RetroPie. These are the screens that have a LED, SCK, SDA, A0, RESET, CS, GND and VCC. Note that VCC here is only suitable for 3.3V!
Thanks to @moosepr on the RetroPie and SudoMod forums.
In this case I have used
- The screen is a red 1.44" SPI 128x128 V1.1
- A Raspberry Pi Zero (also tested on a Pi Zero W)
- A clean installation of Retropie 4.3
Make sure you can SSH to your RetroPie first.
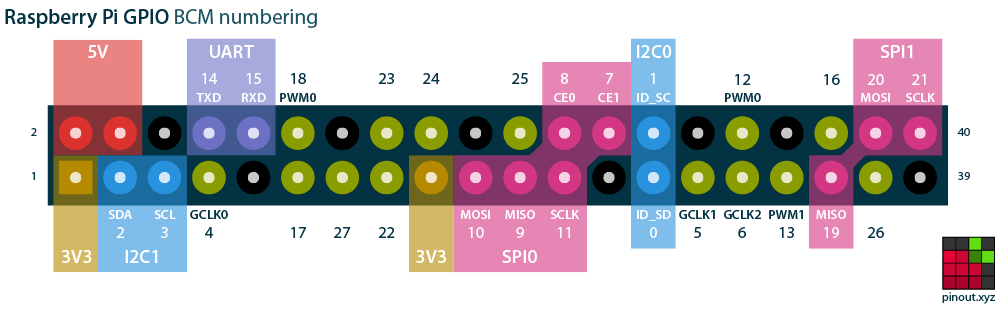
Thie Raspberry Pi Zero pinout is as follows (courtesy of pinout.xyz):
Hook up your screen. The wiring is as follows:
| Display Pin | Pi Pin | GPIO |
|---|---|---|
| LED | 16 | 23 |
| SCK | 23 | 11 |
| SDA | 19 | 10 |
| A0 | 18 | 24 |
| RESET | 22 | 25 |
| CS | 24 | 8 |
| GND | 20 | GND |
| VCC | 17 | 3V3 |
Enable SPI (P4 under 5. Interfacing options) with sudo raspi-config
edit /etc/modules and add
spi-bcm2835
fbtft_device
create /etc/modprobe.d/fbtft.conf and add:
options fbtft_device name=fb_ili9163 gpios=reset:25,dc:24,led:23 speed=40000000 bgr=1 rotate=1 custom=1 fps=60
I’m not sure whether needed, but I also edited /boot/config.txt and uncommented dtparam=spi=on.
Reboot.
After reboot the screen should have done something (backlight should be on, screen might have flashed etc.). In my case some garbage pixels are showing as well.
Then, in order to copy the RetroPie screen from HDMI to our SPI screen we are going to install fbcp as shown by notro:
sudo apt-get install cmake
git clone https://github.com/tasanakorn/rpi-fbcp
cd rpi-fbcp/
mkdir build
cd build/
cmake ..
make
sudo install fbcp /usr/local/bin/fbcp
We can now test this and have the HDMI output mirrored to our SPI screen by running pbcp &.
Then to start this every boot, we edit /etc/local.rc and add
fbcp &
Before exit 0.
Then follow the guide to set a custom resolution to set RetroPie to 128x128 pixels (or whatever you need).